Official BookForge User Guide & Technical Manual
Welcome to the official developer and publisher documentation for BookForge Engine by Story2Book. BookForge is an enterprise-grade, client-side typesetting studio running entirely inside your Web Browser. It automatically parses raw manuscripts, applies mathematical typography reflow, embeds multi-asset illustrations, and compiles Amazon KDP print-ready PDFs in seconds.
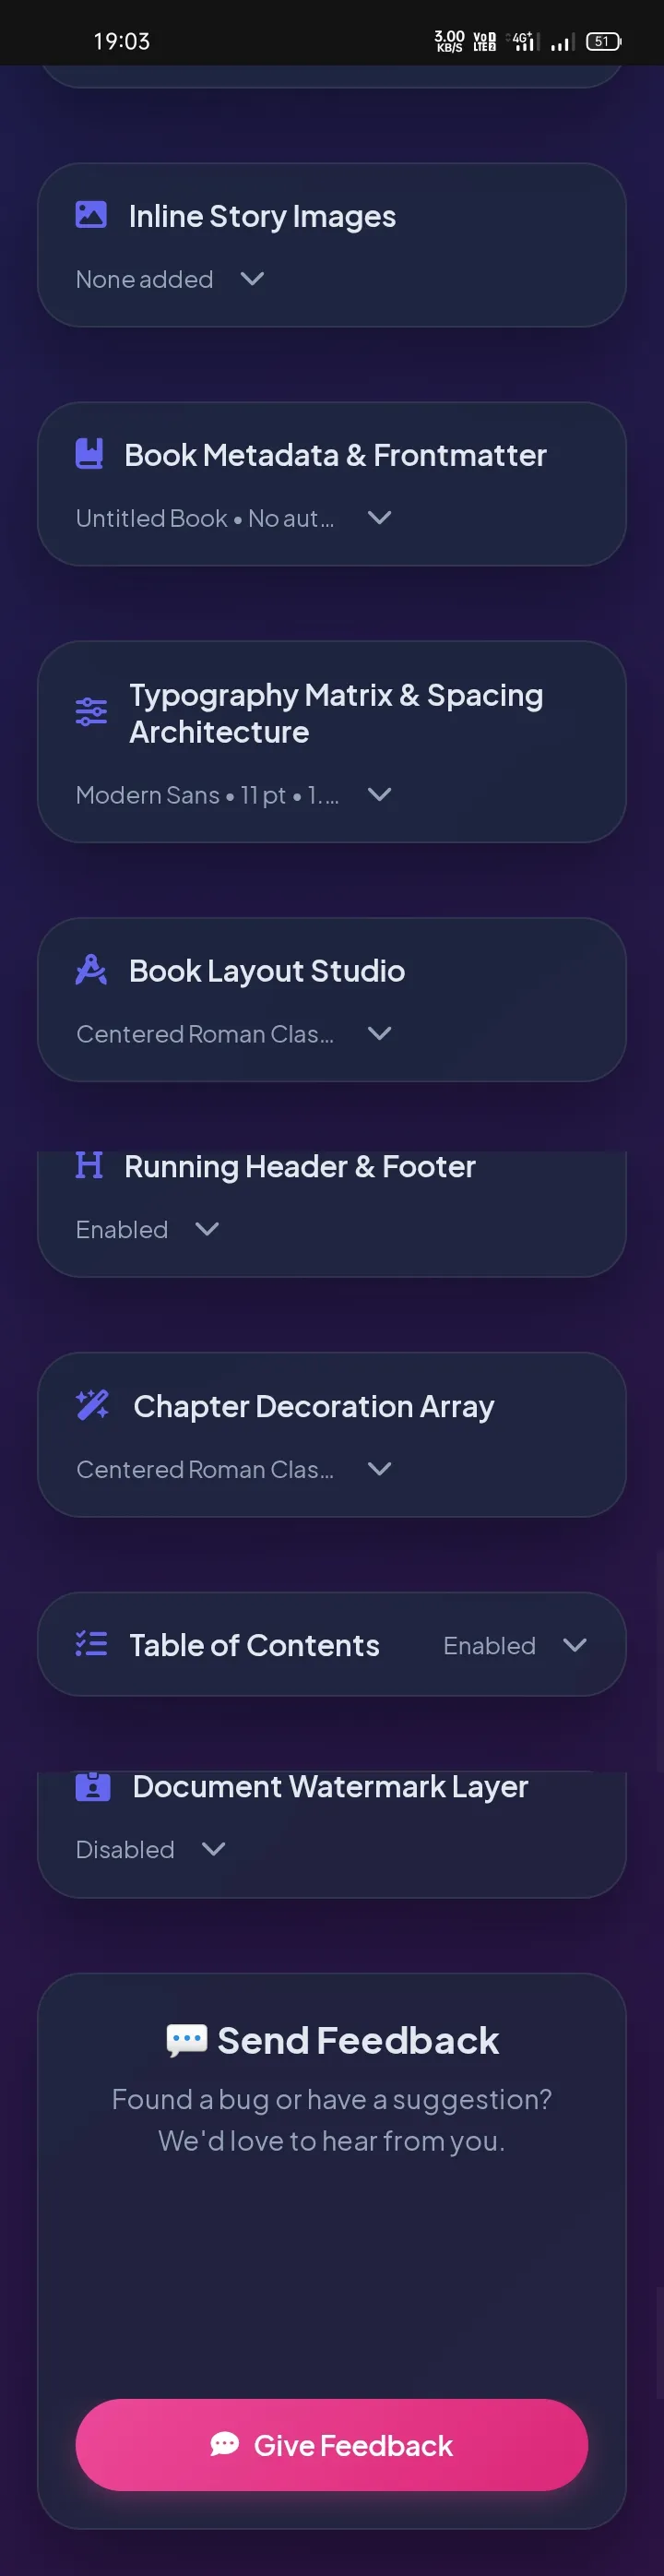
Before formatting your complete manuscript, we strongly recommend creating a small test book first. Spending just a few minutes testing the layout can save hours of work later and help you achieve a much more professional print-ready result.
- Create a small sample book with 2–3 chapters before formatting your complete manuscript.
- Learn the correct manuscript structure, including when to use
#,##,###, subheadings, front matter, scene breaks, and other formatting rules. - Experiment with different Chapter Start Styles, Chapter Decorations, Subheading Decorations, Scene Break Dividers, Running Headers & Footers, Typography settings, Fonts, Trim Sizes, Paper Palette options, Paragraph Controls, Page Numbers, Table of Contents, Watermarks, and other available layout features.
- You can freely adjust the size, spacing, alignment, and position of supported elements. This includes uploaded images, chapter decorations, subheading decorations, scene break dividers, drop caps, spacing, and many other visual elements until the layout matches your preferred book design.
- Generate a sample PDF and carefully review every page on your device before formatting your complete manuscript.
- Once you are satisfied with the appearance and print quality, simply keep the same settings for your complete novel or book.
1. Cover Design & Wrapper Assets
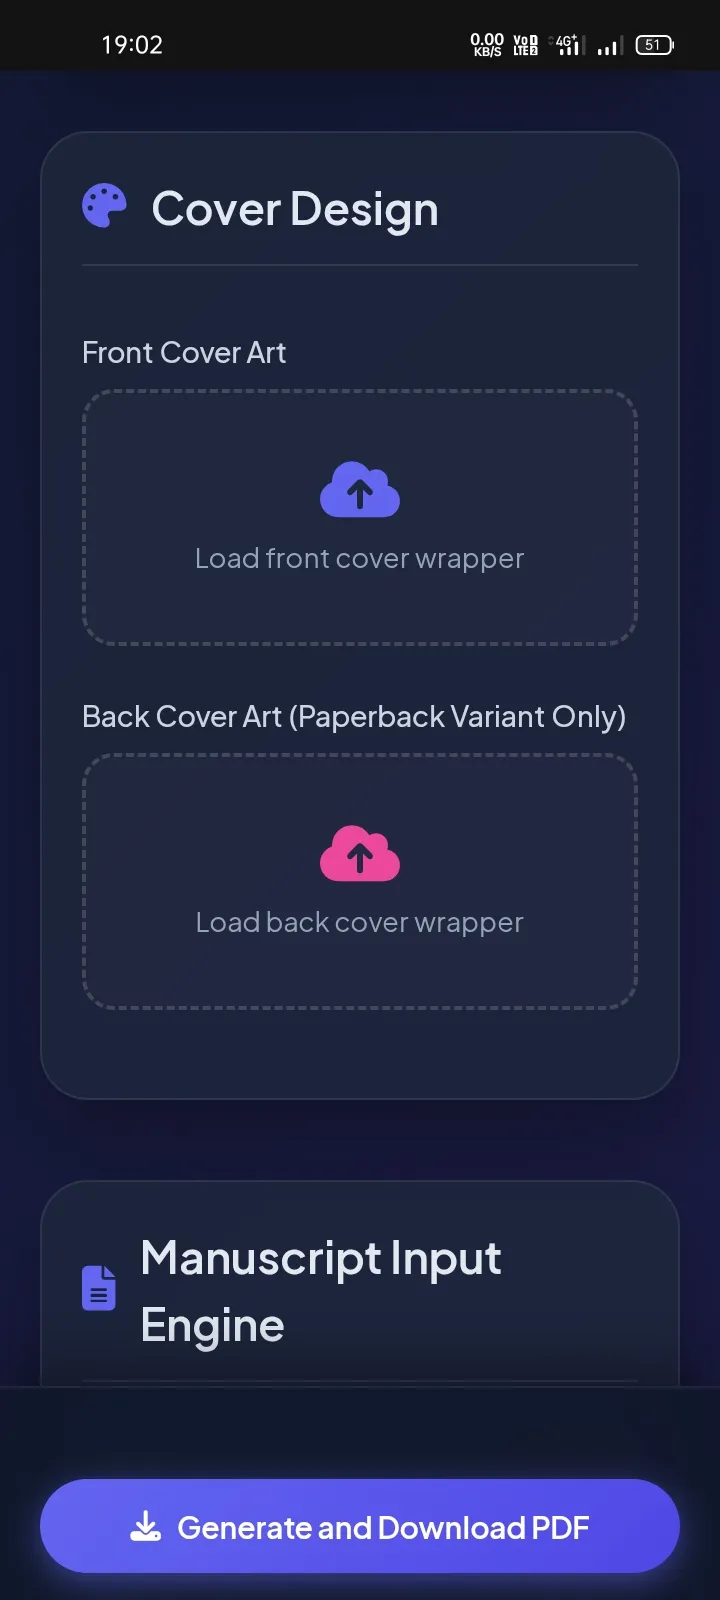
- Front Cover Art Upload: Accepts PNG, JPG, or WebP artwork. Automatically scales artwork to form Page 1 of the generated PDF document.
- Back Cover Art Upload: Formats artwork specifically for paperback rear wrapper print specifications.
- Cover Fallback Toggle: Automatically detaches cover compilation if no image file is loaded, bypassing directly to the title page without generating blank pages.
- Navigate to the Cover Studio module in the control sidebar.
- Click
Upload Front Coverand select your high-resolution cover image file. - (Optional) Upload a matching rear cover file under
Upload Back Cover. - Preview the instant live thumbnail inside the canvas area.
- Export your PDF document; Page 1 will automatically render as your print cover.
Uploaded file: fantasy_novel_cover_6x9.png (Size: 1800 x 2700 px)
The engine builds exact 6x9 inch Page 1 vector bounds and embeds the artwork cleanly with 0 margin bleed errors.
- Use 300 DPI images matching your exact target book trim size ratio (e.g., 1800x2700px for 6x9 in).
- Keep front cover text centered or clear of the outer 0.25-inch trim bleed margin.
- ❌ Uploading low-resolution thumbnail images (e.g., 400x600px), causing blurry physical prints.
- ❌ Uploading landscape orientation images for a portrait paperback cover.
2. Manuscript Input & Import Engine
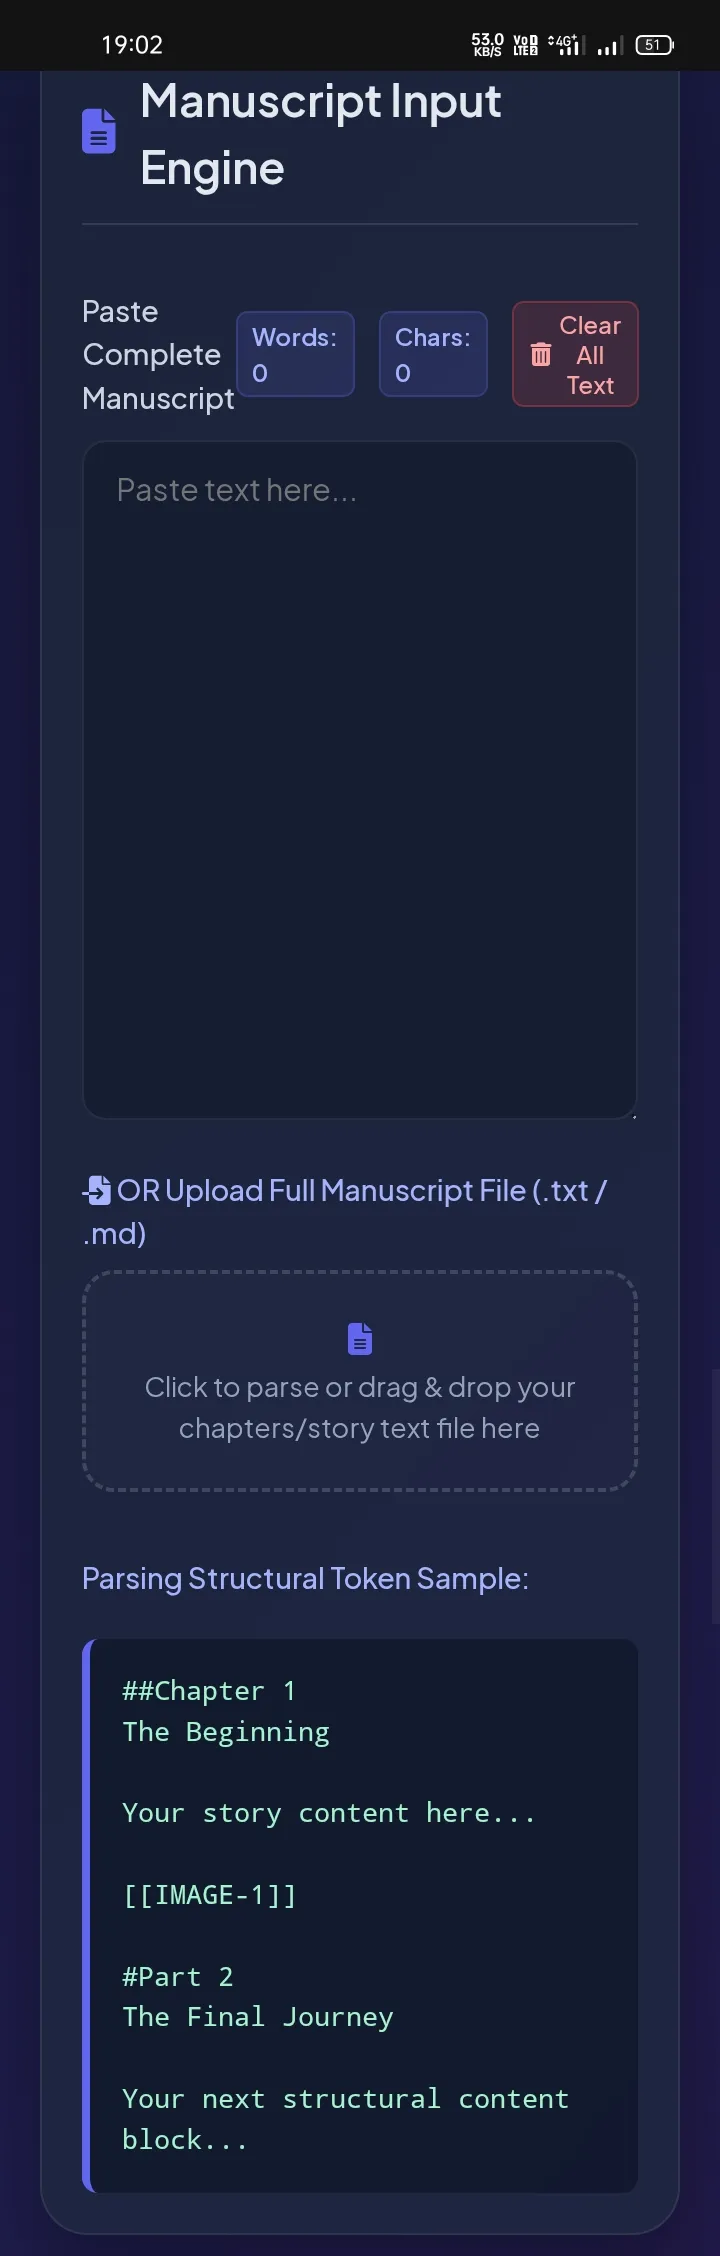
- Direct Text Editor: High-performance text input area with active Word Count and Character Count tracking.
- File Upload Engine (.txt / .md): Drag-and-drop or click to load entire manuscript files instantly into browser memory.
- Clear All Text Button: Resets the manuscript editor with one click.
- Smart Structural Parsing: Automatically converts Markdown structural markers (
#,##,###,**) into book headings.
- Open the Manuscript Input Engine section.
- Click
Upload Full Manuscript Fileto select your.txtor.mdmanuscript, or directly paste your text. - Verify that chapter titles start with
##for automatic page breaks. - Check the real-time word counter to confirm full document load.
## CHAPTER 1 — THE JOURNEY BEGINS
The cold morning wind swept across the mountain path.
Triggers a hard page break, generates a styled Chapter Header, and registers "CHAPTER 1 — THE JOURNEY BEGINS" into the Table of Contents.
- Format your manuscript using Markdown syntax before importing.
- Ensure there are blank lines between paragraphs for optimal line reflow calculations.
- ❌ Pasting formatted MS Word text with hidden non-standard control characters.
- ❌ Using standard single hashes (
#) for chapters instead of double hashes (##).
## Chapter heading, BookForge automatically formats it into an elegant, unnumbered "Prologue" section!
3. Markdown Formatting Syntax & Structural Rules
##)Starting a line with two hashes (##) instructs the engine to trigger an automatic page break and start a new chapter on a fresh page. It formats the heading and registers an entry in the Table of Contents.
## CHAPTER 1 – THE CURSED INHERITANCE
###)Starting a line with three hashes (###) creates an in-chapter subheading. Subheadings do not trigger page breaks; they render inline with professional letter spacing and optional divider lines.
### Arrival at Blackwood Manor
**Text**)Wrapping text in double asterisks on its own standalone line (**Headline**) converts it into a prominent, centered headline or section ending marker.
**THE FIRST NIGHT’S WHISPERS** or **THE END**
#)A single hash (#) formats major book divisions or part sections.
# PART ONE
***)Placing three asterisks on an empty line (***) generates an ornamental scene break divider.
***
4. Inline Story Images & Multi-Asset Engine
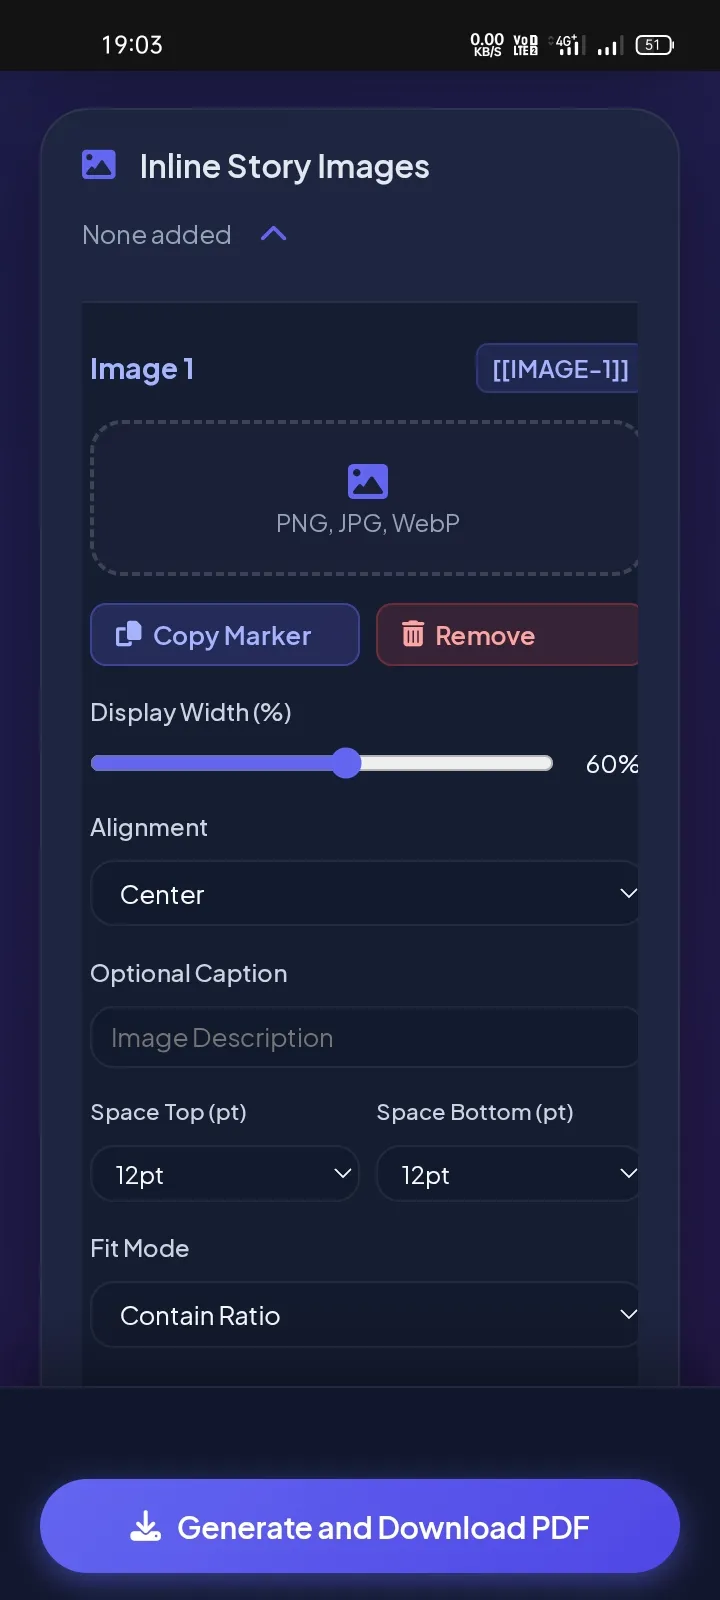
- Dynamic Token Slots: Generates unique identifiers (e.g.,
[[IMAGE-1]],[[IMAGE-2]]) for every uploaded graphic. - Display Width Slider: Scale image width from 10% to 100% of printable text width.
- Alignment Selector: Position images Left, Center, or Right.
- Fit Modes: Toggle between
Contain Ratio(preserves original aspect ratio) orFit Text Width. - Padding & Captions: Fine-tune top/bottom padding (6pt–18pt) and attach optional italicized descriptions.
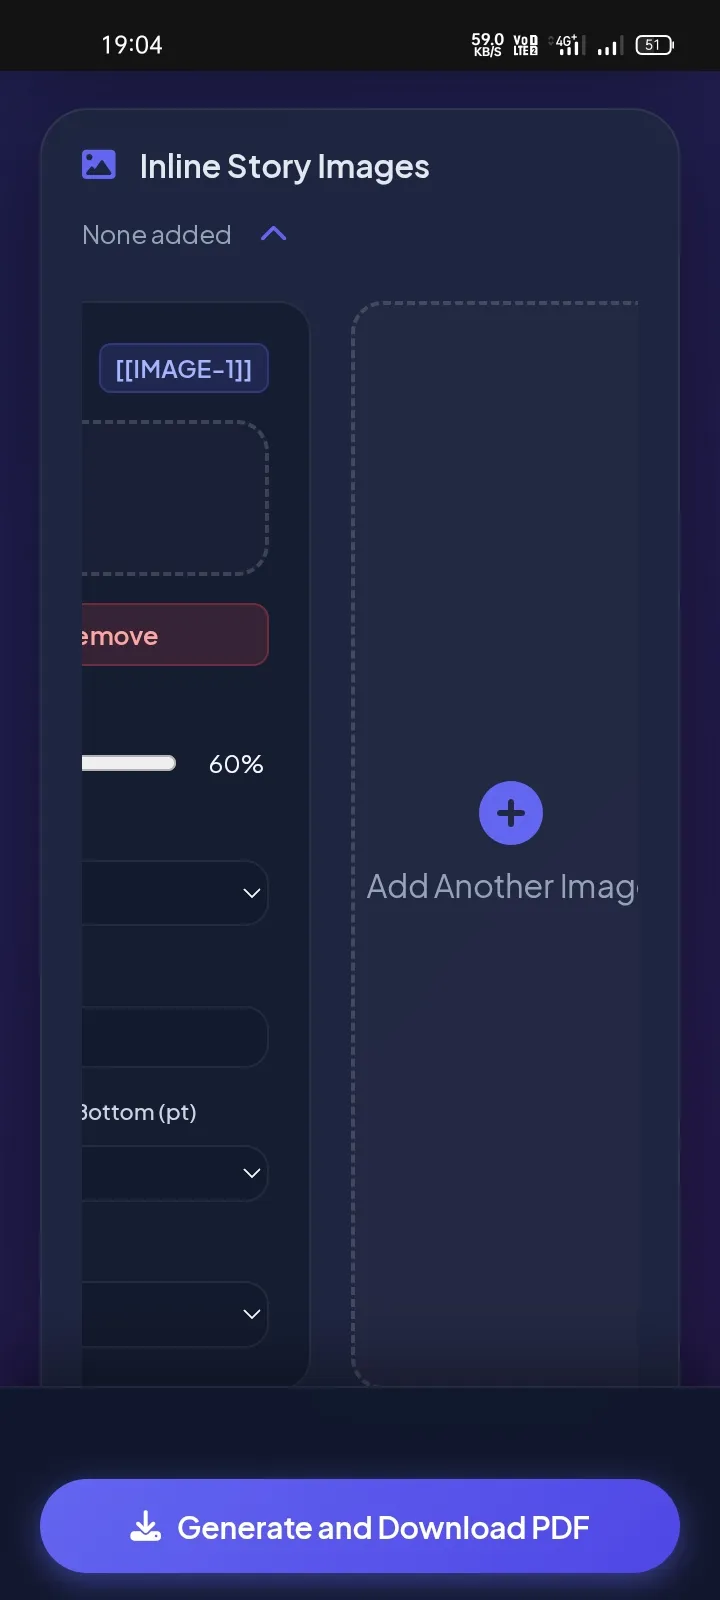
- Expand the Inline Story Images panel.
- Click
Add Another Imageto create a slot and upload an image file. - Click
Copy Markerto copy the token (e.g.,[[IMAGE-1]]). - Paste the token into your manuscript exactly where the image should appear.
- Adjust width, alignment, and caption as needed.
They unlocked the ancient chest.

[[IMAGE-1]]

Inside lay the gilded compass.
The uploaded illustration renders between the two paragraphs, centered at your chosen percentage width.
- Compress high-resolution artwork to JPG or WebP under 500 KB before uploading.
- Place image tokens on their own standalone line in the manuscript.
- ❌ Uploading 10 MB PNG files, which slows down client-side PDF rendering speed.
- ❌ Typing tokens incorrectly (e.g., writing
[IMAGE 1]instead of[[IMAGE-1]]).
5. Book Metadata & Frontmatter Architecture
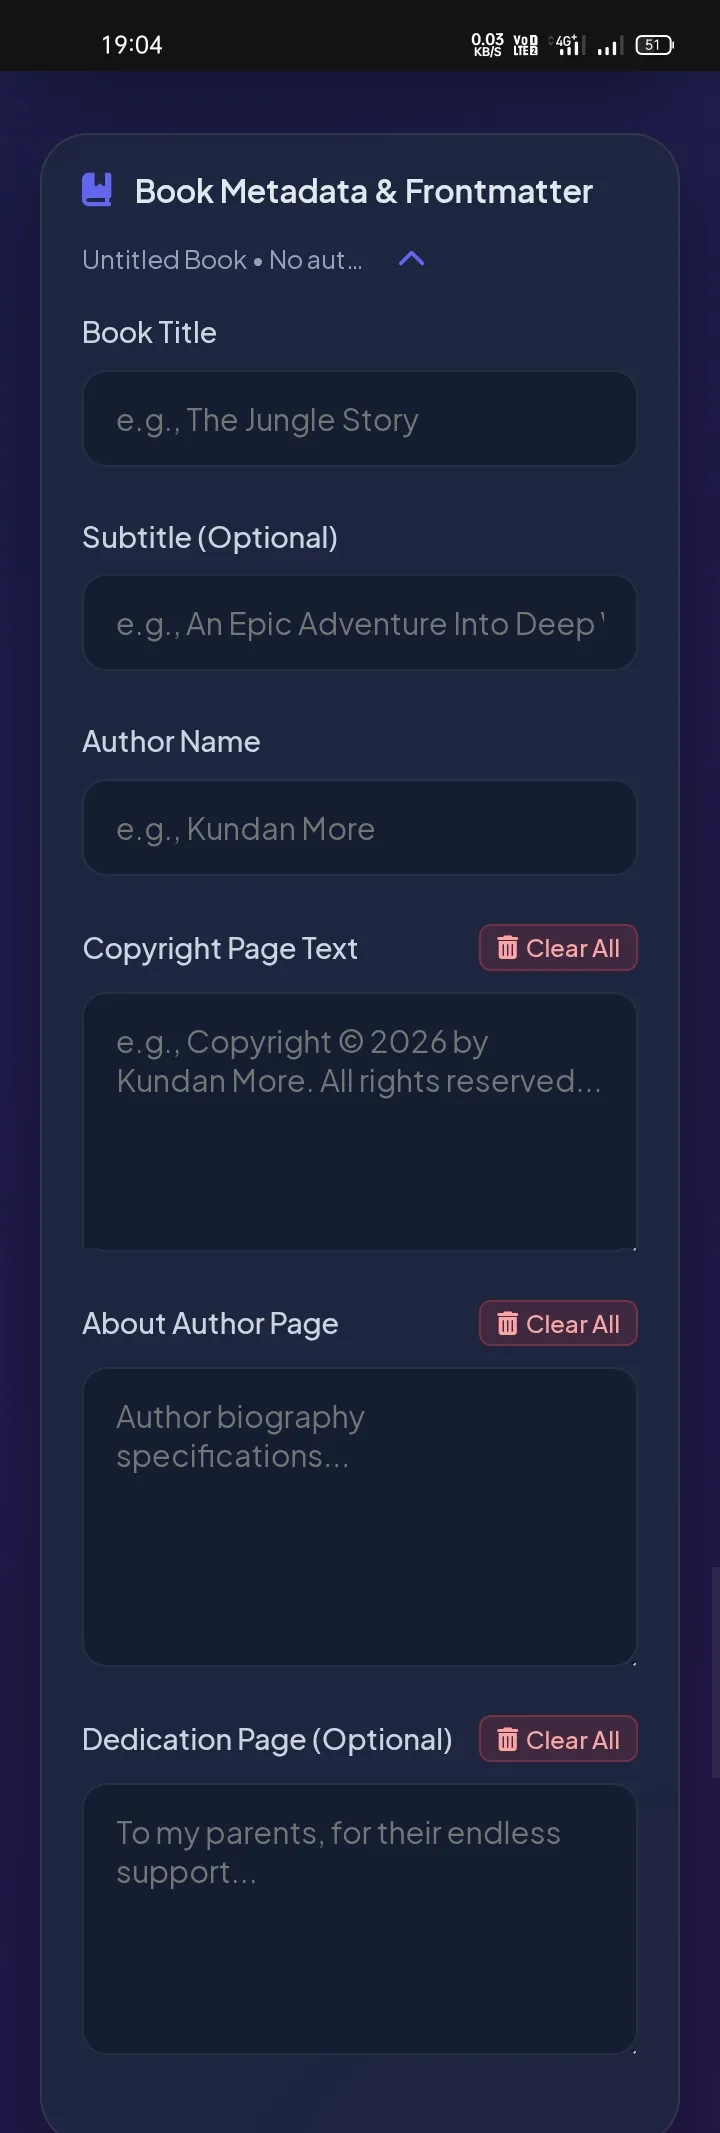
- Book Title & Subtitle: Populates header pages and running header pagination.
- Author Name: Appears on title cards and links to author biography pages.
- Copyright Page Text: Generates industry-compliant legal copyright text with custom years and ISBN numbers.
- Dedication Page Text: Centers personal dedication text on an isolated front page.
- About Author Section: Formats a dedicated closing biography page at the end of the manuscript.
- Open the Book Metadata & Frontmatter tab.
- Fill in your
Book Title,Subtitle, andAuthor Name. - Enter copyright details (e.g., "© 2026 All Rights Reserved").
- (Optional) Enter your Dedication text and Author Bio.
For Sarah — who always believed in the magic.
Renders a standalone page right after the copyright page with italicized, centered text.
- Leave optional fields (like Dedication) empty if not needed; the engine automatically removes unnecessary blank pages.
- ❌ Repeating the Book Title inside the manuscript body text, creating duplicate title pages.
6. Typographic Matrix & Spacing Architecture
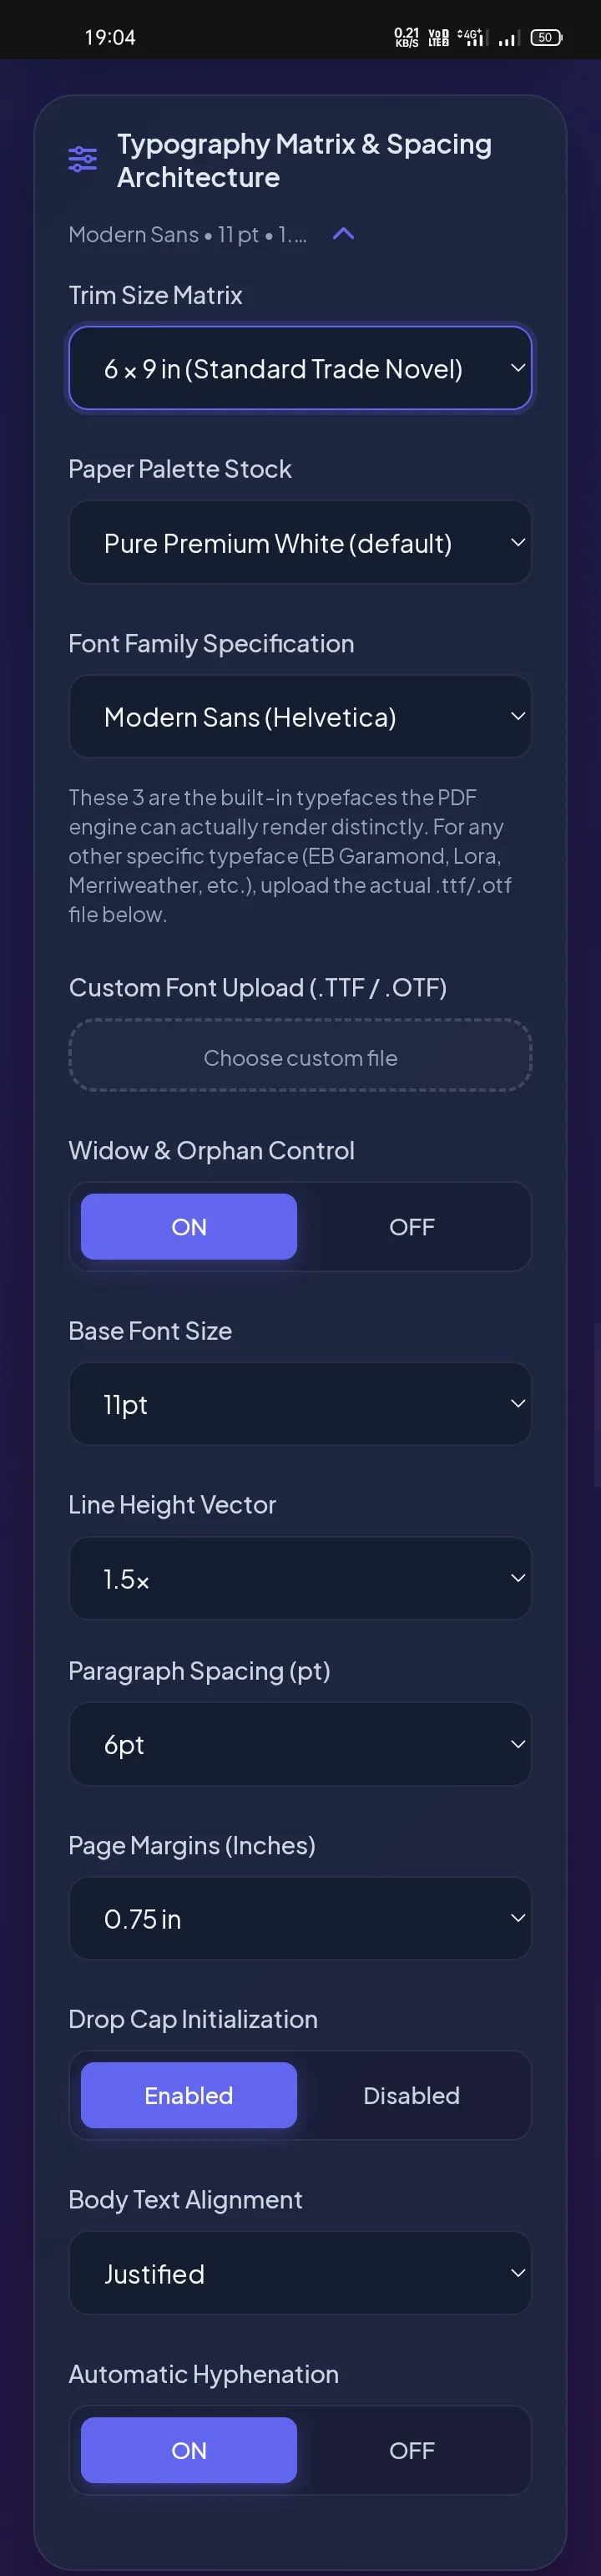
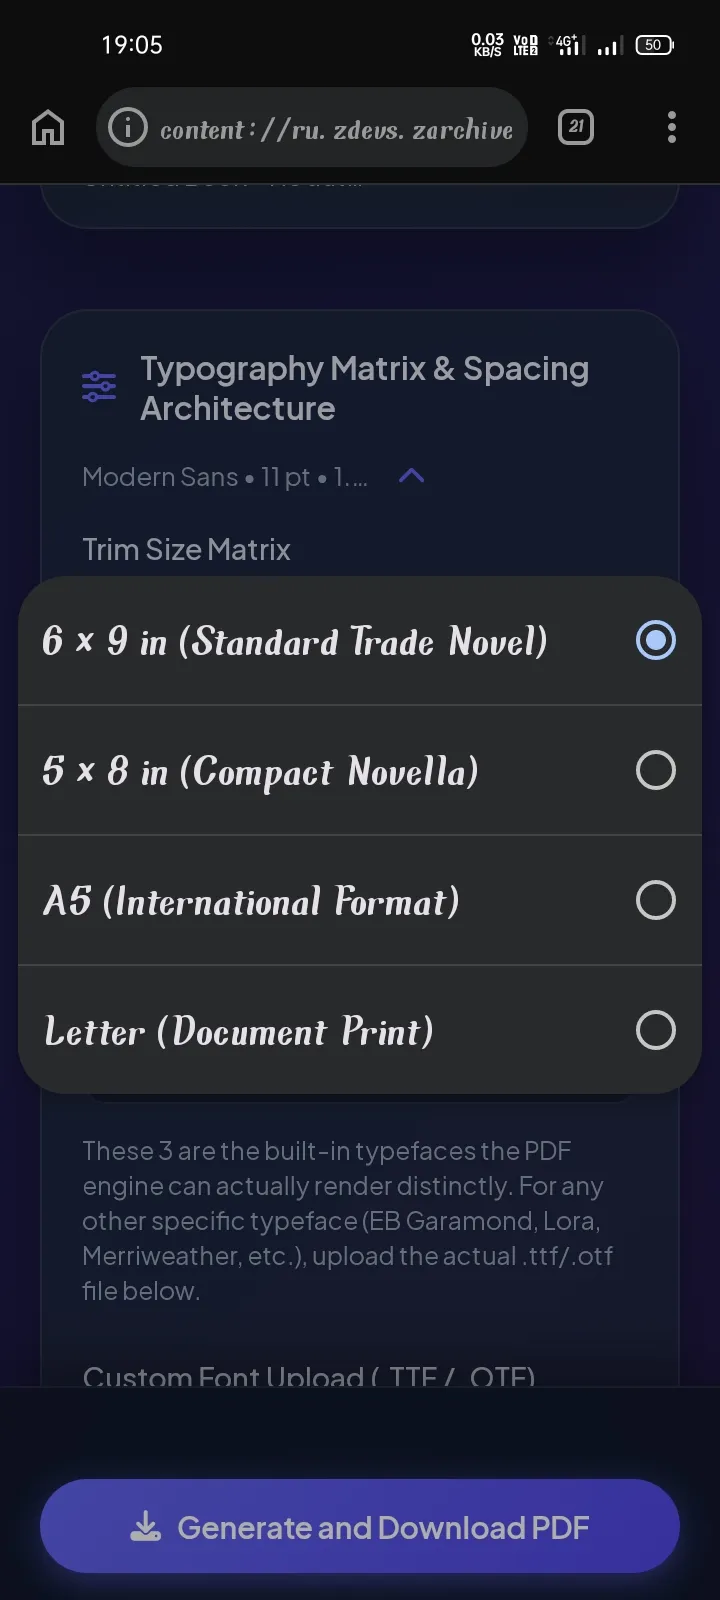
- Trim Size Matrix: Choose between 6x9 in (Standard Novel), 5x8 in (Novella), A5 (International), or Letter size.
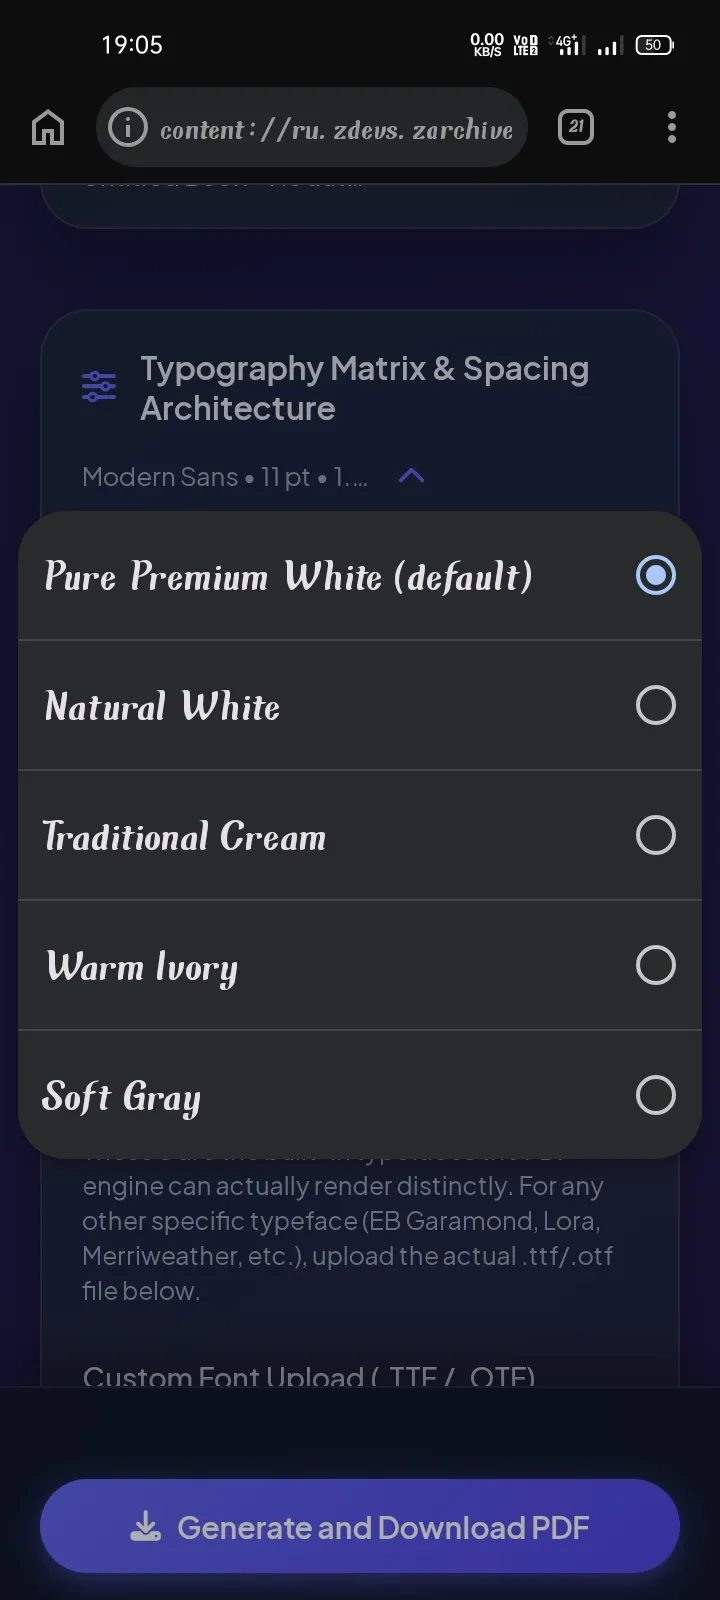
- Paper Stock Palette: Select White, Natural, Cream, Ivory, or Soft Gray paper background simulation.
- Font Engines: Classic Serif (Times), Modern Sans (Helvetica), Typewriter (Courier), or Custom Font Upload (.TTF/.OTF).
- Widow & Orphan Control: Toggle prevention of single trailing lines at top/bottom margins.
- Base Spacing Controls: Base Font Size (10–12pt), Line Height (1.3x–1.7x), Paragraph Spacing (0–12pt), and Margins (0.50–1.00 in).
- Select Typography Matrix & Spacing Architecture in the settings menu.
- Choose your publication
Trim Size(e.g., 6 x 9 in). - Select your target font family or click
Upload Custom Fontfor custom.TTFfiles. - Adjust base margin and line spacing sliders.
Uploaded: Cinzel-Regular.ttf (Hindi / Devanagari or Custom Serif)
Embeds the custom vector glyphs into the PDF compiler, rendering non-Latin and custom typefaces cleanly.
- Use 6x9 in trim with 0.75 in margins for standard fiction novels.
- Always leave Widow & Orphan Control ON for professional print quality.
- ❌ Setting margins under 0.5 inches, which causes Amazon KDP print reject errors.
7. Book Layout Studio (Micro-Control Suite)
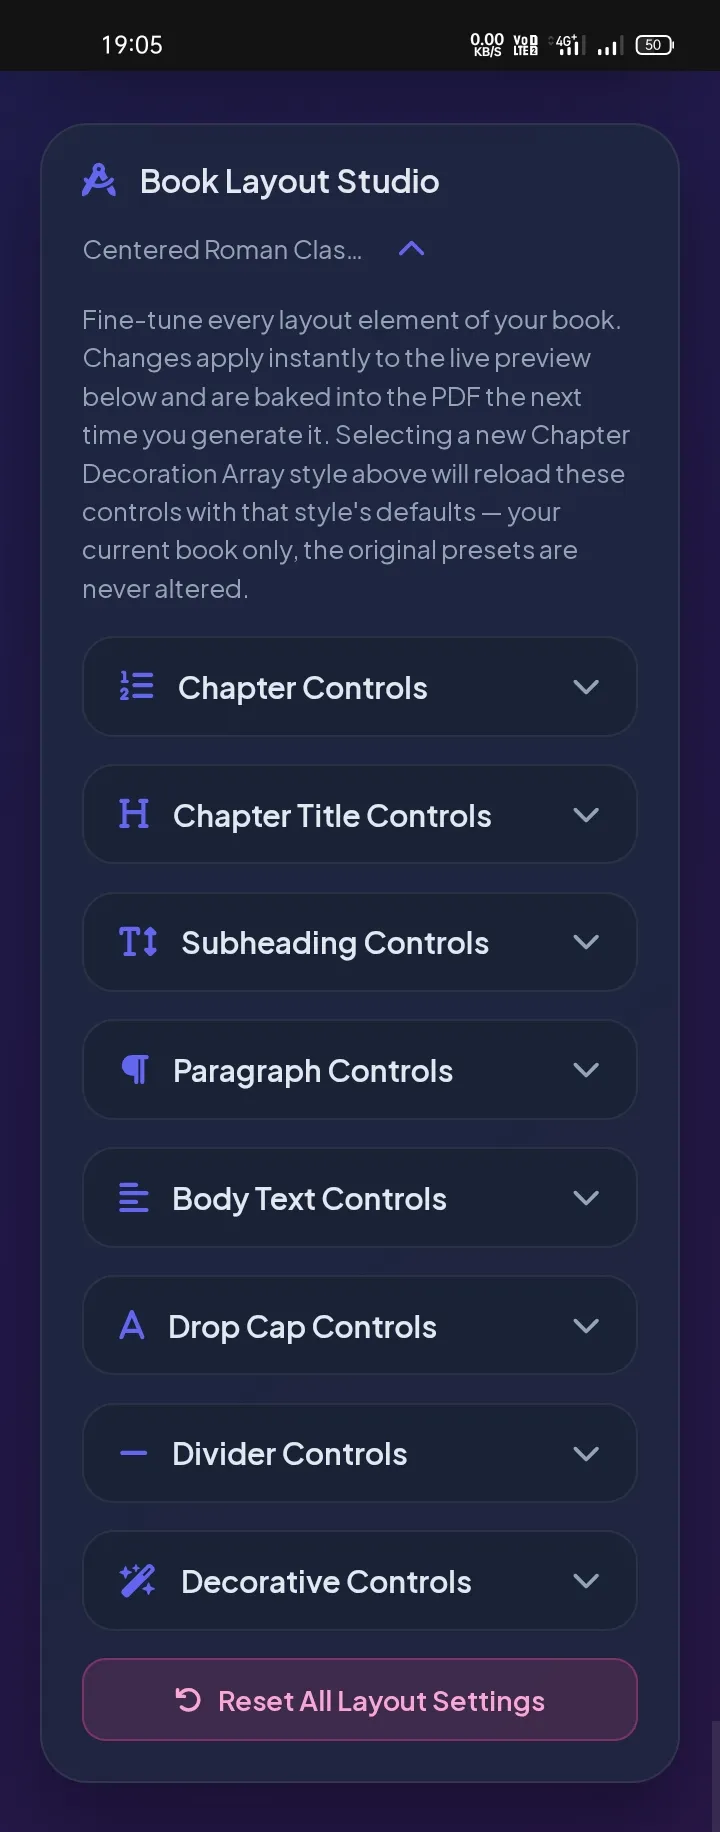
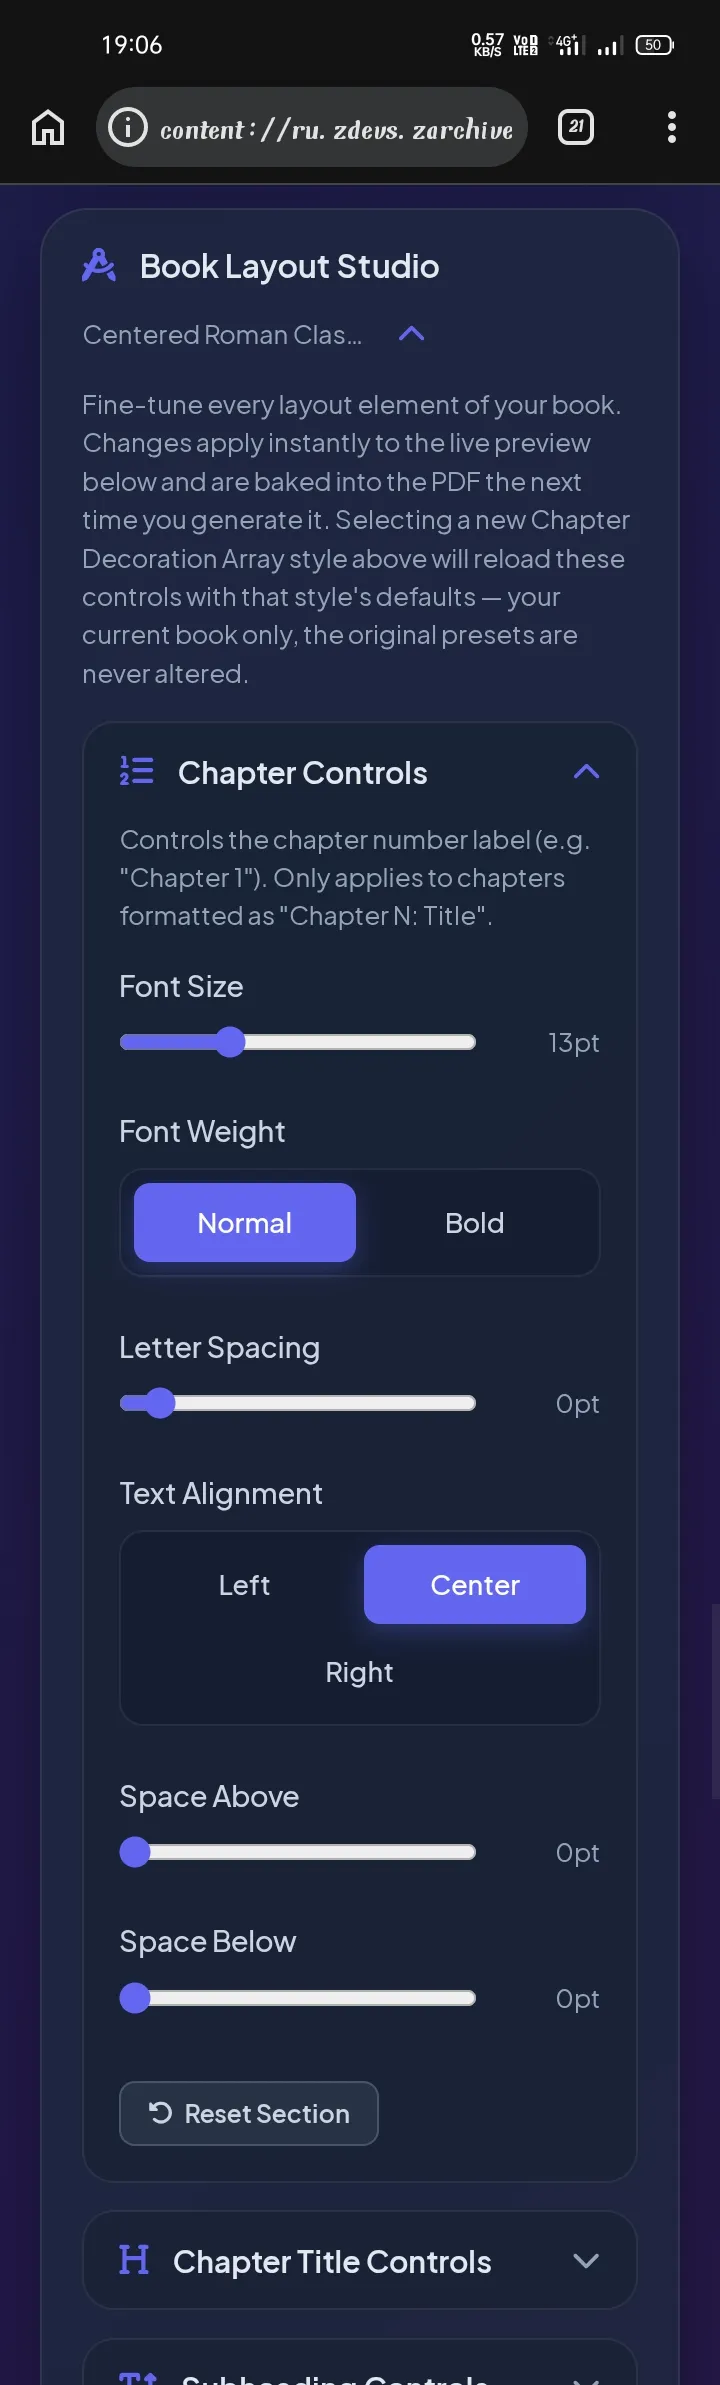
- 1. Chapter Controls (Chapter Number Label): Adjust Font Size (6pt–30pt), Font Weight (Normal/Bold), Letter Spacing (-1pt to 12pt), Text Alignment (Left/Center/Right), Space Above (0–40pt), and Space Below (0–40pt).
- 2. Chapter Title Controls: Fine-tune Title Font Size (10pt–40pt), Weight, Letter Spacing, Line Height (1.0x–2.2x), Alignment, Space Above, and Space Below.
- 3. Subheading Controls: Set Subheading Font Size (8pt–24pt), Weight, Letter Spacing, Alignment, Space Above/Below, and toggle
Apply to all subheadings automatically. - 4. Paragraph Controls: Toggle
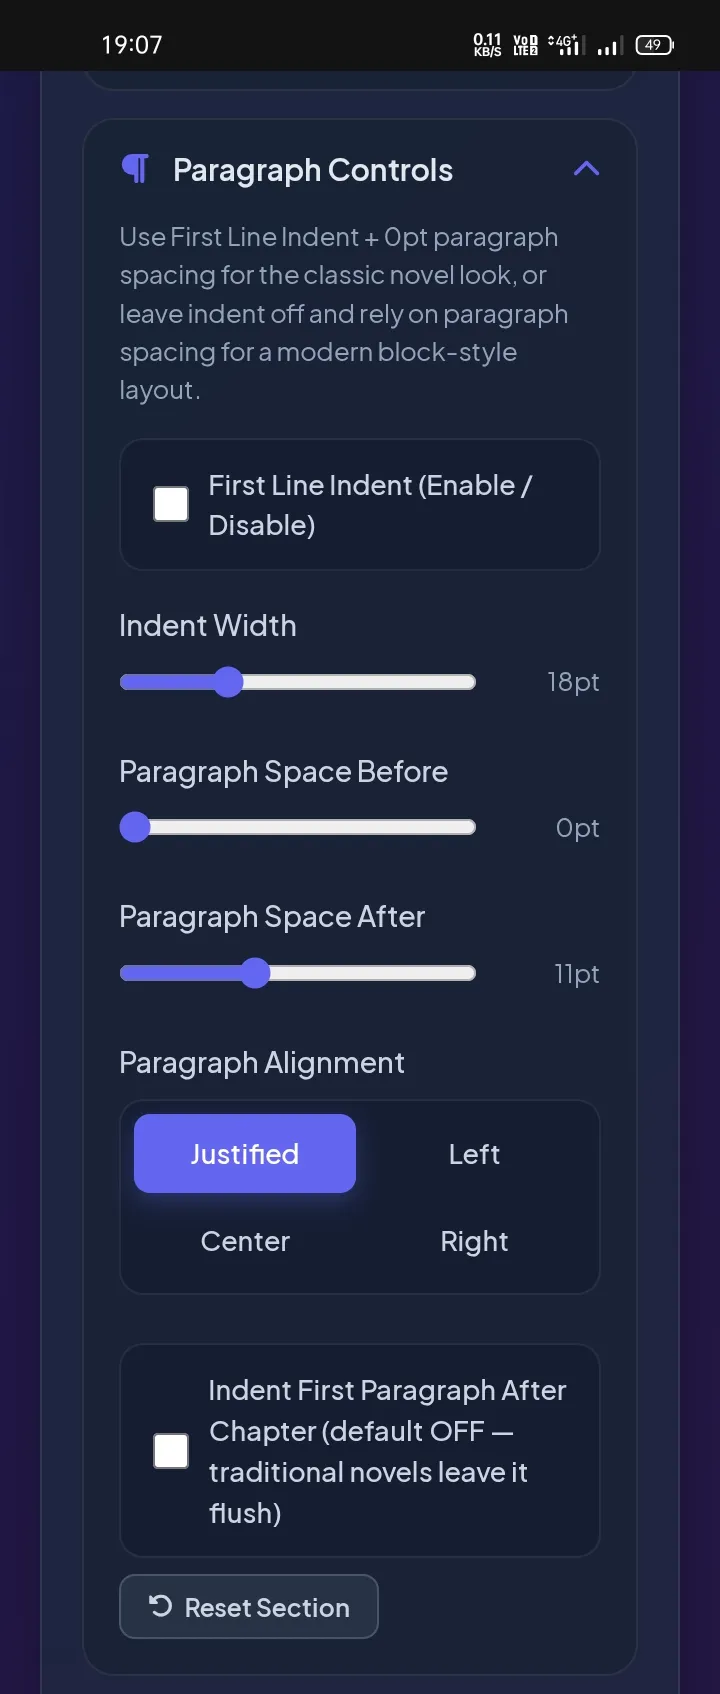
First Line IndentON/OFF, adjust Indent Width (6pt–48pt), Paragraph Space Before (0–30pt), Paragraph Space After (0–30pt), Alignment (Justified/Left/Center/Right), and toggleIndent First Paragraph After Chapter(default OFF). - 5. Body Text Controls: Micro-tune Font Size (8pt–16pt), Line Height Multipliers (1.0x–2.2x), Letter Spacing (-1pt to 8pt), and Word Spacing (0pt–10pt).
- 6. Drop Cap Controls: Toggle Drop Cap ON/OFF, set Drop Cap Scale (2.0x–9.0x), Line Span (1 to 6 lines), Distance From Text (0–20pt), and select a custom color via color picker.
- 7. Divider Controls: Custom Divider Width (40%–160%), Thickness (40%–220%), Alignment (Left/Center), Space Above/Below, and Custom Color override.
- 8. Decorative Controls: Fine-tune Decorative Asset Size (50%–150%), Position (Top Header vs. Bottom Postscript), Opacity (20%–100%), and Space Above/Below.
- 9. Live Layout Preview Box: Displays a real-time, interactive CSS preview of your active chapter layout as you adjust sliders.
- Expand the Book Layout Studio accordion panel.
- Open
Drop Cap Controlsand set Drop Cap toEnabled, set Lines Occupied to3, and choose a primary accent color. - Open
Paragraph Controlsand set Indent Width to18pt. - Check the Live Layout Preview Box at the bottom of the section to verify layout changes in real-time.
- (Optional) Click
Reset Sectionon any module orReset All Layout Settingsat the bottom to restore defaults.
Drop Cap: Enabled (3 Lines, Color: #2563eb) | Indent: 18pt | Body Font Size: 11pt | Line Height: 1.5x
Renders a 3-line tall royal blue drop cap on the first paragraph, while all subsequent paragraphs carry an 18pt first-line indent with 1.5x line height.
- Keep
Indent First Paragraph After Chapterdisabled for traditional fiction novel layouts. - Use 2 or 3 lines span for drop caps to maintain clean body line flow.
- ❌ Enabling both Drop Cap AND First Line Indent on the first paragraph, creating awkward spacing.
8. Running Header & Footer Architecture
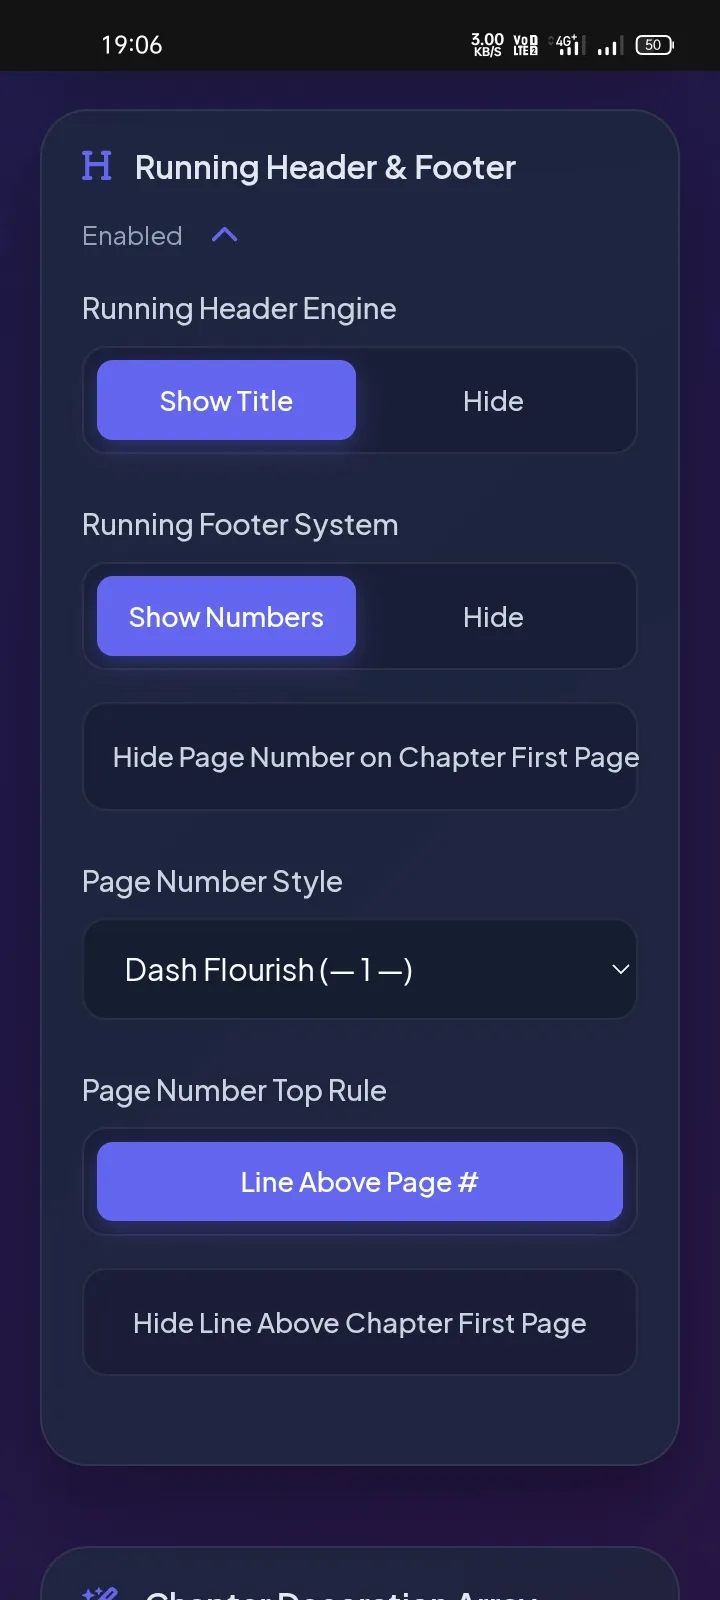
- Running Header Toggle: Display Book Title on left pages and Chapter Title on right pages.
- Page Number Style: Choose Plain (1, 2, 3) or Dash Flourish (— 1 —).
- Top Rule Line: Toggle a subtle divider line beneath running headers.
- First Page Suppression: Automatically hides running headers/footers on chapter opener pages.
- Go to the Running Header & Footer section.
- Enable
Running Header Engine. - Select your preferred page number style (e.g.,
Dash Flourish (— 1 —)). - Keep
Page Number Top Rulechecked for print separation.
Left Page Header:  STORY2BOOK                    [Page 14]
Right Page Header: [Page 15]          CHAPTER 2 — DARK WOODS
- Always suppress running headers on chapter opening pages to follow standard publishing guidelines.
- ❌ Displaying headers on blank pages or frontmatter title pages.
9. Scene Break Dividers
***) into styled decorative dividers separating sub-scenes within chapters.
- Preset Glyphs: Select Asterisks (***), Floral Heart (❦), Diamond Geometric (❖), or Tilde Waves (~ ~ ~).
- Custom Graphic Divider: Upload custom PNG divider graphics.
- Scaling & Padding: Fine-tune divider size and vertical spacing.
- Type
***on an empty line in your manuscript where a scene ends. - Open Scene Break Divider settings.
- Choose your divider glyph (e.g., Floral Heart ❦).
He left without saying a word.

***

Three days later in London...
Replaces *** with a centered ❦ symbol padded with 12pt top and bottom spacing.
- Use subtle, clean symbols that match your book's genre (e.g., ❦ for Romance, ❖ for Fantasy).
- ❌ Typing scene break markers inline inside standard text paragraphs.
10. Chapter Start Styles & Decoration Assets
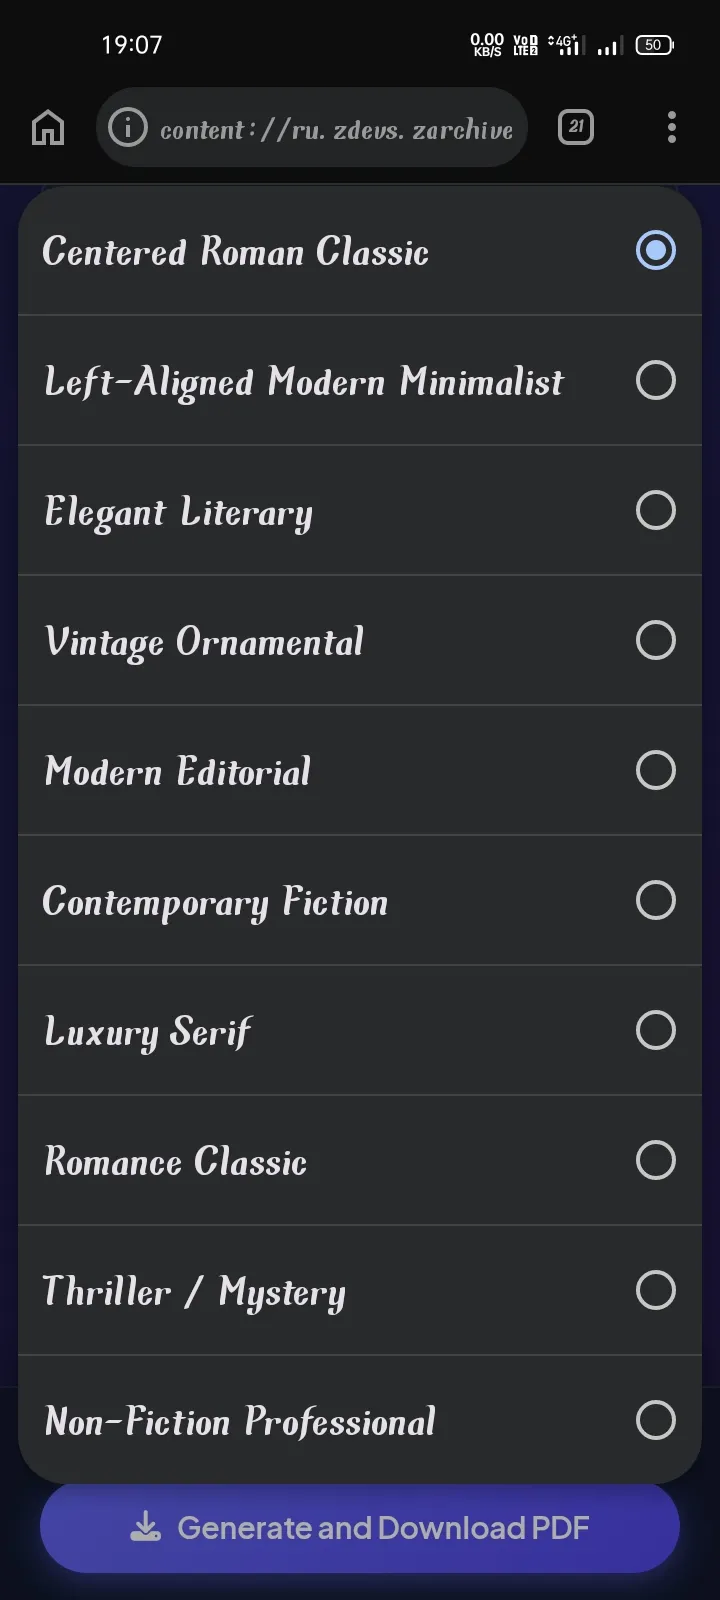
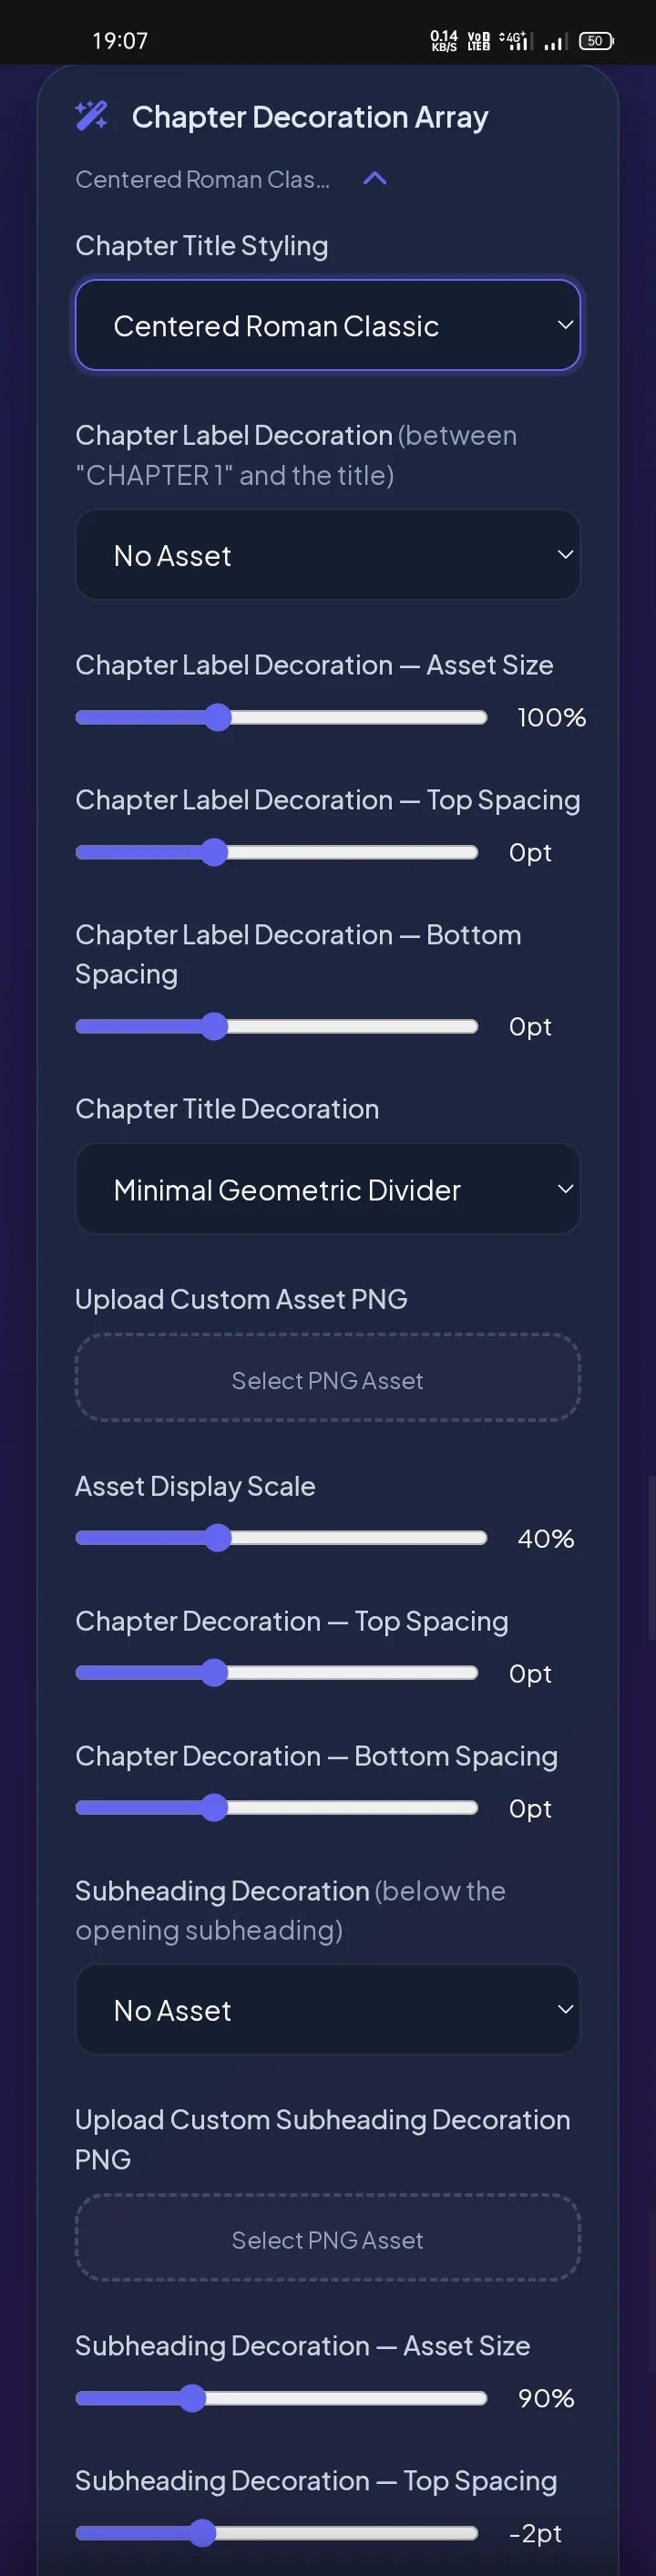
- Centered Serif: Classic centered layout with a thin divider beneath the subheading.
- Left Modern: Clean left-aligned sans-serif layout, no built-in subheading divider.
- Elegant Literary: Centered bold-italic serif title with a diamond divider accent.
- Vintage Ornamental: Centered warm-brown serif styling with diamond dividers.
- Modern Editorial: Left-aligned sans label with a heavy divider rule.
- Contemporary Fiction: Centered tracked-letter serif title with a thin divider.
- Luxury Serif: Centered gold-toned serif with a double-rule divider.
- Romance Classic: Centered bold-italic serif with a dot-style divider.
- Thriller/Mystery: Left-aligned bold sans label with a heavy red-accented divider.
- Nonfiction Professional: Left-aligned navy sans styling suited for business and instructional books.
Each preset controls font family, weight, size, tracking, color, and divider style for the Chapter Label, Chapter Title, Subheading, and running-header text simultaneously.
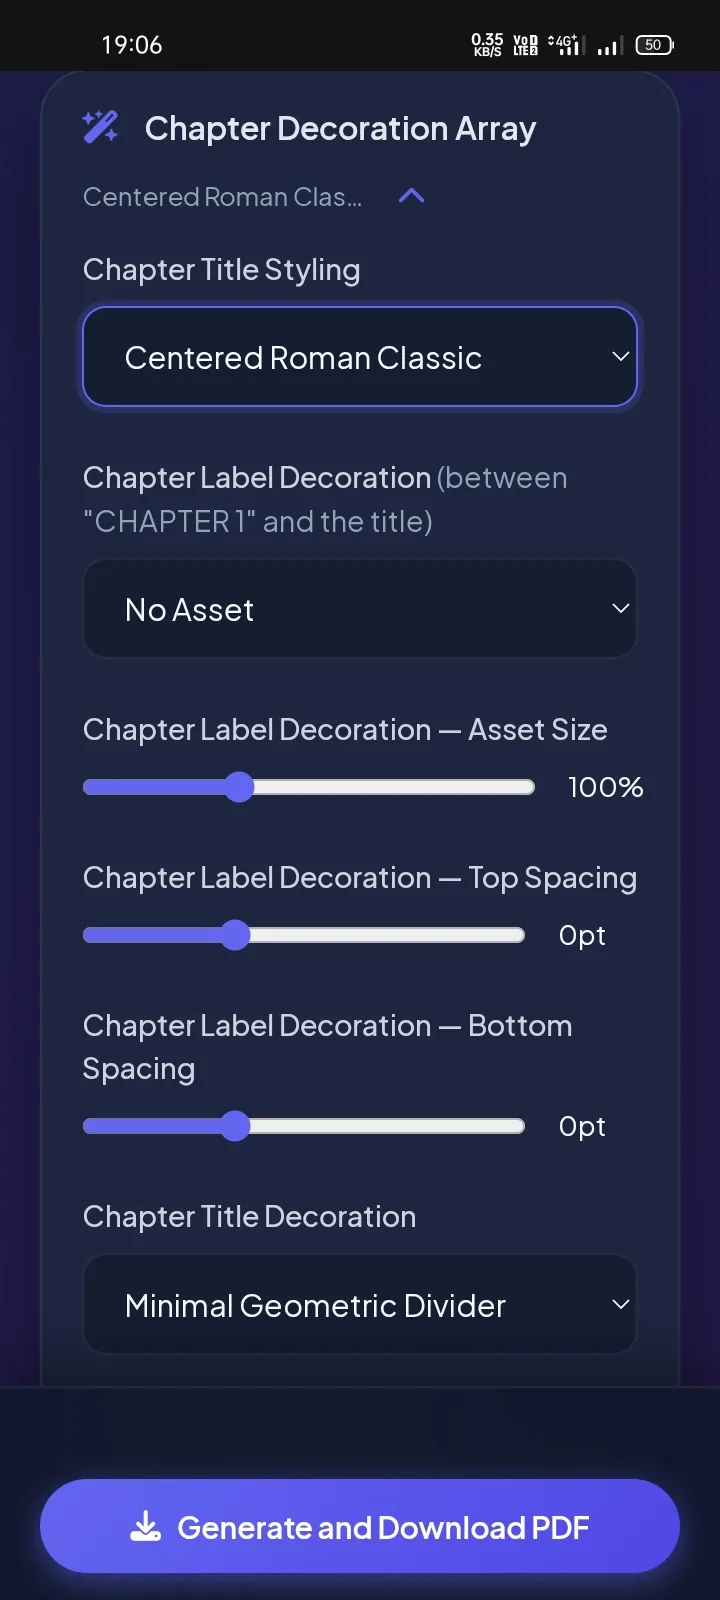
- Asset Options: No Asset, Laurel Sprig (SVG), Small Flourish (SVG), Star Dot (SVG).
- Manual Controls: Asset Size (50%–150%), Top Spacing, and Bottom Spacing sliders.
- Asset Options: No Asset, Classic Floral Vector, Minimal Geometric Divider, Custom Uploaded Graphic, Ornate Flourish (SVG), Crest Accent (SVG), Twin Dots Rule (SVG), Underline Flourish (SVG), Geometric Badge (SVG).
- Placement Rules: Render Before Heading, After Heading, or Both.
- Manual Controls: Scale, Opacity, and Top/Bottom Spacing adjustment sliders.
- Asset Options: No Asset, Custom Uploaded Graphic, Ornate Flourish (SVG), Crest Accent (SVG), Twin Dots Rule (SVG), Underline Flourish (SVG), Geometric Badge (SVG).
- Manual Controls: Asset Size (50%–200%), Top Spacing, and Bottom Spacing sliders — independent of the Chapter Title Decoration sliders.
- Apply to All Subheading Pages: When enabled, the same decoration also renders below every later in-chapter subheading (
###), not just the chapter-opening one.
- Open Chapter Start Style and choose a preset (e.g.,
Vintage Ornamental). - Open Chapter Title Decoration and select an asset (e.g.,
Ornate Flourish (SVG)). - (Optional) Open Subheading Decoration and select a matching asset for consistency.
- Fine-tune Size and Spacing sliders for each decoration independently.
Vintage Ornamental + Ornate Flourish (SVG) After Title
Renders an elegant flourish graphic directly underneath every chapter title.
- Match your preset selection to your manuscript genre.
- Keep Chapter Title and Subheading decorations from the same visual family (e.g., both flourish-style) for a cohesive look.
- ❌ Over-scaling graphics so large that they push chapter body text onto the next page.
11. Auto Table of Contents (TOC) Engine
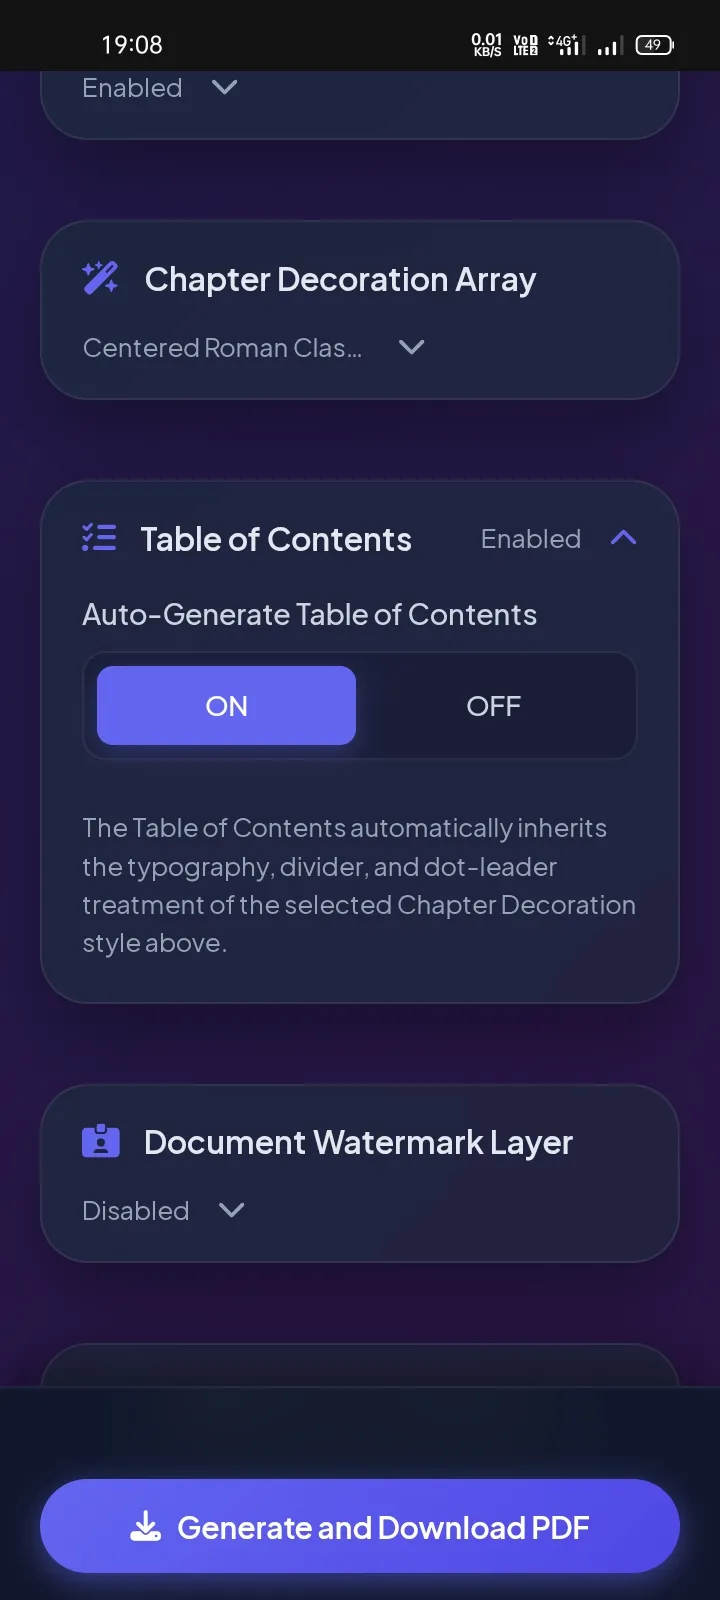
- Auto Generation Toggle: Compiles all
## Chapterheaders into a structured list. - Dot Leader Style: Enable/Disable leader dots connecting chapter titles to page numbers.
- Subheading Inclusion: Choose whether to include
###subheadings inside the TOC.
- Enable
Auto-Generate Table of Contentsin settings. - The engine automatically places the TOC page right after the Copyright/Dedication pages.
CHAPTER 1 — THE CURSED INHERITANCE ..................... 1
CHAPTER 2 — THE BLACKWOOD MANOR ........................ 18
- Keep chapter titles concise so they don't wrap awkwardly across multiple lines in the TOC.
- ❌ Manually typing a TOC in your raw text, resulting in duplicate TOC pages.
12. Document Watermark Layer
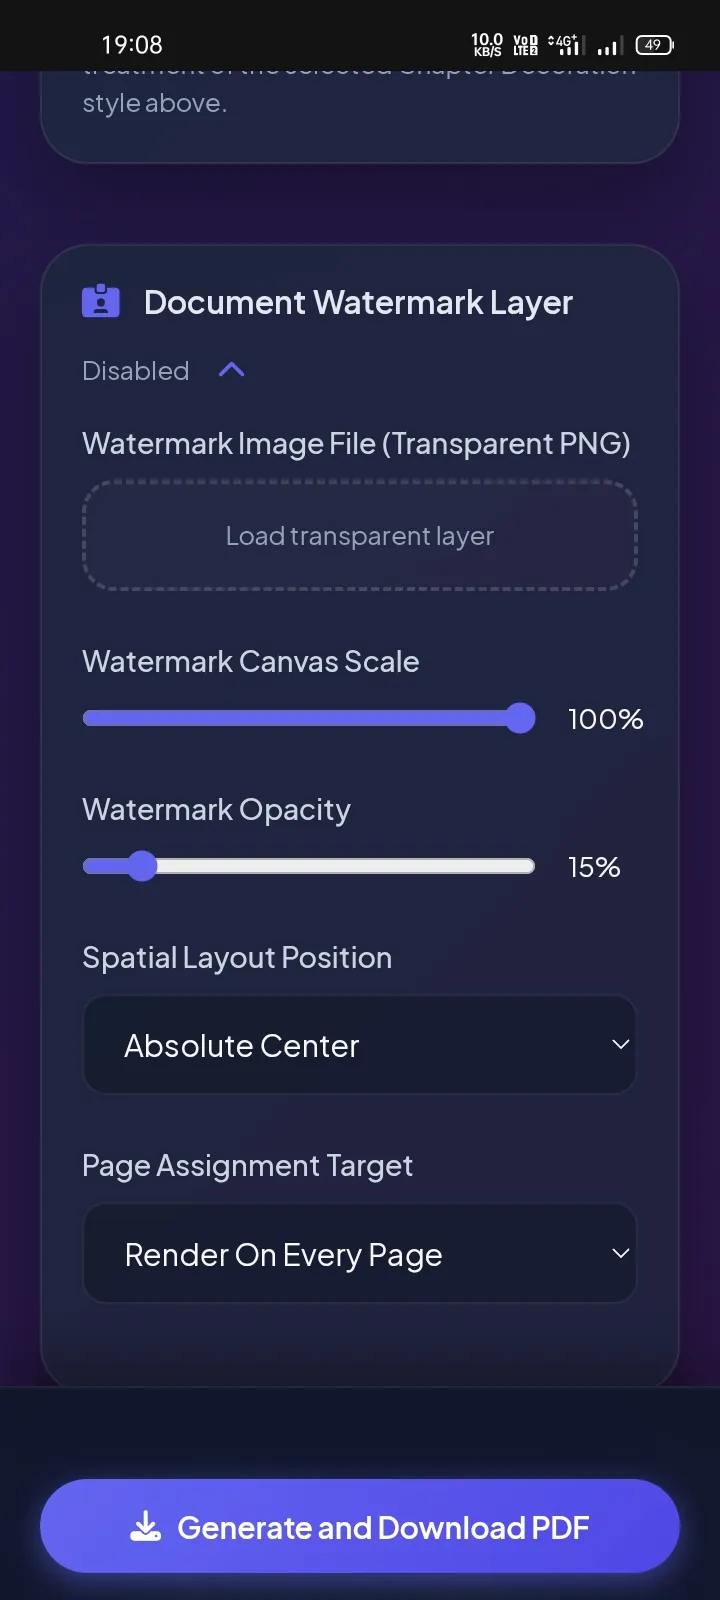
- PNG Watermark Upload: Upload custom PNG overlay images.
- Opacity Slider: Control transparency from 5% (subtle) to 100% (opaque).
- Target Scope: Apply watermark to Every Page, Chapters Only, or First Page Only.
- Open Document Watermark Layer.
- Upload your transparent
watermark.pngfile. - Set Opacity to 15% and choose
Render On Every Page.
Image: "UNREVISED DRAFT PROOF" | Opacity: 15%
Renders a subtle, non-intrusive diagonal text overlay across all manuscript pages for reviewer distribution.
- Keep watermark opacity under 15% to avoid obscuring body text.
- ❌ Leaving draft watermarks enabled when exporting the final print-ready PDF.
12. Paperback PDF Generation Engine
- Client-Side Engine: Compiles PDFs using local browser WebAssembly resources.
- Embed Fonts: Auto-embeds font glyph vectors into the PDF container.
- Bleed & Trim Box Settings: Formats margins to comply with Amazon KDP print specifications.
- Review your settings in the live layout preview.
- Click
Generate and Download PDF. - Wait for the client-side compilation bar to reach 100%.
- Save the PDF directly to your computer.
Engine compiles 240-page manuscript at 6x9 in trim size.
Generates a vector PDF ready for immediate upload to Amazon KDP, IngramSpark, or Barnes & Noble Press.
- Always open your exported PDF in Adobe Acrobat Reader to inspect margins before submitting for printing.
- ❌ Closing the browser tab while the client-side compiler is generating the PDF file.
13. Download Options & File Packages
- Download PDF: Exports the print-ready PDF document.
- Export Layout Configuration: Saves all typography and studio settings as a
.jsonfile for future projects. - Import Saved Preset: Reloads saved studio configurations instantly.
- Click
Export Layout Presetto backup your studio settings. - Click
Download PDFto save your print file.
my_fantasy_preset.json containing custom fonts, margin rules, and drop cap presets.
- Export your layout configuration
.jsonfile after setting up custom styles so you can reuse it for future book series.
- ❌ Clearing browser cache without backing up your custom layout presets.
14. Performance Optimization Rules
- Compress Images: Keep inline illustrations under 500 KB each using JPG or WebP formats.
- Close Background Tabs: Free up browser memory when generating documents over 300 pages long.
- Use Modern Browsers: Run BookForge on the latest versions of Google Chrome, Brave, Microsoft Edge, or Mozilla Firefox for fast WebAssembly processing.
15. Troubleshooting & Common Fixes
| Issue | Probable Cause | Resolution |
|---|---|---|
| Chapter not starting on new page | Used single hash # instead of double hash ## |
Add two hashes ## before the chapter title. |
| Image not appearing in PDF | Token typo or missing slot reference | Verify token format matches [[IMAGE-1]] exactly. |
| PDF download freeze at 99% | Oversized 10MB+ images exhausting browser memory | Compress images under 500KB and retry. |
| KDP Trim Bleed Warning | Margins set below 0.5 inches | Increase margins to 0.75 in in the Typography Matrix. |
16. Frequently Asked Questions (FAQ)
No. BookForge processes your document 100% locally inside your web browser. Your text and images are never transmitted or stored on remote servers.
Yes. Exported PDFs follow Amazon KDP paperback print guidelines, including exact trim sizes, embed fonts, and safety bleed margins.
No account or registration is required. You can format manuscripts and export files directly inside your browser.
Beginner Quick Start Guide
- Upload Manuscript: Open BookForge and paste your text or upload your
.txt/.mdfile under Manuscript Input Engine. - Add Chapter Titles: Ensure every chapter header starts with
##(e.g.,## CHAPTER 1). - Set Metadata: Enter your Book Title and Author Name under Book Metadata.
- Select Trim Size: Choose
6 x 9 inand your preferred font under Typography Matrix. - Export PDF: Click
Generate and Download PDFand save your document!
Complete Formatting Blueprint Sample
# PART ONE: THE SHADOW OF BLACKWOOD

## CHAPTER 1 – THE CURSED INHERITANCE

### Arrival at Blackwood Manor

The horse-drawn carriage ground to a sudden halt before the rusted iron gates. Rain lashed relentlessly against the dark glass panels, casting jagged shadows across the cobblestone pathway.

[[IMAGE-1]]

**THE FIRST NIGHT'S WHISPERS**

A strange, low humming resonance filled the narrow corridors as the old grandfather clock struck midnight. Lord Blackwood stepped into the dusty study, clutching the heavy brass key tightly in his trembling hand.

***

The old clock chimed twelve times. The rain had finally ceased, leaving behind a heavy silence that hung over the ancestral grounds.

### The Secret Beneath the Floorboards

Behind the faded tapestry in the library lay a hidden latch. As the wooden panel slid open, a cold draft blew from the dark stairs leading down into the cavernous basement.

[[IMAGE-2]]

**THE END OF CHAPTER ONE**


## CHAPTER 2 – THE LOST COMPASS

The morning light brought no relief, only clearer views of the ruin...
# for major Part sections.• Use
## for every new Chapter (triggers hard page breaks & Table of Contents entry).• Use
### for internal Section Subheadings.• Use
**Headline** on its own line for centered bold section dividers.• Use
[[IMAGE-1]], [[IMAGE-2]] tokens matching uploaded image slots.• Use
*** on an empty line for ornamental scene break dividers.
Glossary of Publishing Terms
- Trim Size: The physical dimensions (width x height) of the printed book page (e.g., 6x9 inches).
- Bleed: Extra artwork area extending beyond the physical page edge to ensure graphics print edge-to-edge without white borders.
- Gutter Margin: Additional margin space added to the inside binding edge of pages so text isn't lost in the spine.
- Drop Cap: A large decorative initial letter at the beginning of a chapter that drops down across several lines of text.
- Widows & Orphans: Single isolated lines of text appearing at the top or bottom of a printed page.
Ready to Format Your Book?
Launch BookForge Engine now to begin client-side manuscript typesetting directly inside your browser.
Launch BookForge Studio Now